

The popular advice is to attach extensions close to the roots and make them tight enough to stay put. That's a poor starting point. A secure fitting should allow your natural hair to move without pinching, pulling or making your scalp sore.
Learning how to put in hair extensions starts with choosing what your hair can comfortably support, not copying the longest result in a photo. For Gold Coast clients, the right plan also needs to work with humidity, swimming and the way you tie your hair up.
Table of Contents
- Choose the Right Extension Method First
- Match Weight to Hair Type and Density
- Prepare a Clean Scalp Before You Attach
- How to Put in Hair Extensions Step by Step
- Stop When Tension Hurts the Scalp
- Book a Gold Coast Fitting That Suits Your Hair
Choose the Right Extension Method First
Your hair sets the brief, and the method follows it. Density, strand strength and the result you want matter more than whether an attachment looks discreet in a close-up photograph.
Start by deciding whether you want length, fullness through the ends or temporary volume for an event. A same-day style needs a different approach from extensions you'll wash, sleep in and maintain between salon appointments. Commitment is part of that call: a clip-in comes out the same night, while a weft or bonded fitting grows down with your hair and needs scheduled refits to keep sitting correctly.
Shortlist by coverage and commitment
Australia's nationally recognised hair-extension competency standard requires consultation, hair analysis, system selection, preparation, appropriate strand and section sizes, application and blending. Fitting extensions is a planned technical service with a defined sequence, and hair goes where the assessment says it can be carried.
During our consultation at Hair Extensions Full Stop on the Gold Coast, we assess your natural hair, discuss your goals and recommend the most suitable option. Bring an inspiration photo, but expect the recommendation to account for your starting length, density and condition.
Extension methods compared before you fit them
| Method | How it attaches | Usually suits | Heat or adhesive | Weight character |
|---|---|---|---|---|
| Invisible weft | Flat weft track anchored in rows | Medium to thick hair wanting discreet volume | No glue on the hair | Flat against the scalp |
| Butterfly weft | Flexible lightweight weft | Hair that needs movement as well as length | No glue on the hair | Lighter than a standard weft row |
| Micro bead | Small bead closed on a natural section | Many hair types, including reusable wear | Neither glue nor heat | Moderate individual load |
| Nano bead | Smaller bead than a micro | Fine or delicate hair | Neither glue nor heat | Most discreet individual option |
| Keratin bond | Individual keratin tip sealed to a strand | Strand-by-strand blending | Heat to seal the bond | Individual, smooth finish |
| Tape-in | Adhesive sandwich around a thin panel | Straighter hair and a quicker full or partial fit | Adhesive tape | Flat panels |
| Clip-in | Temporary clips on an anchor section | Occasional length or volume | Neither | Removed the same day |
These descriptions make a shortlist, and suitability still depends on the load each attachment ends up carrying. A small attachment can still be overloaded with too much hair, and a flat weft can still be weighted past what the supporting section holds.
The finished load matters as much as the attachment's name.
Choose the result your starting hair allows
The common mistake is copying a very long, full-head look onto fine hair. Extra length needs enough density through the ends to blend, which tempts some people to keep adding hair when the natural base is already struggling to support it.
I'd favour a believable, comfortable increase in length over a dramatic change that needs heavy coverage. Someone chasing fuller ends may only need a partial installation through the mid-lengths and ends, which keeps the daily strain lower.
Keep the most promising methods from the comparison and discuss their practical differences during assessment. Our guide to choosing a hair-extension method on the Gold Coast can help you prepare questions about coverage, attachment visibility and maintenance.
Match Weight to Hair Type and Density
Weight isn't just how much extension hair comes out of the packet. It's how that hair is shared across the natural sections supporting it. A modest amount placed badly can pull more than a carefully distributed fitting.
At our Ashmore studio, every installation is customised to your natural hair, lifestyle and desired result. That includes discussing whether you swim regularly, wear a work bun or prefer your hair loose.
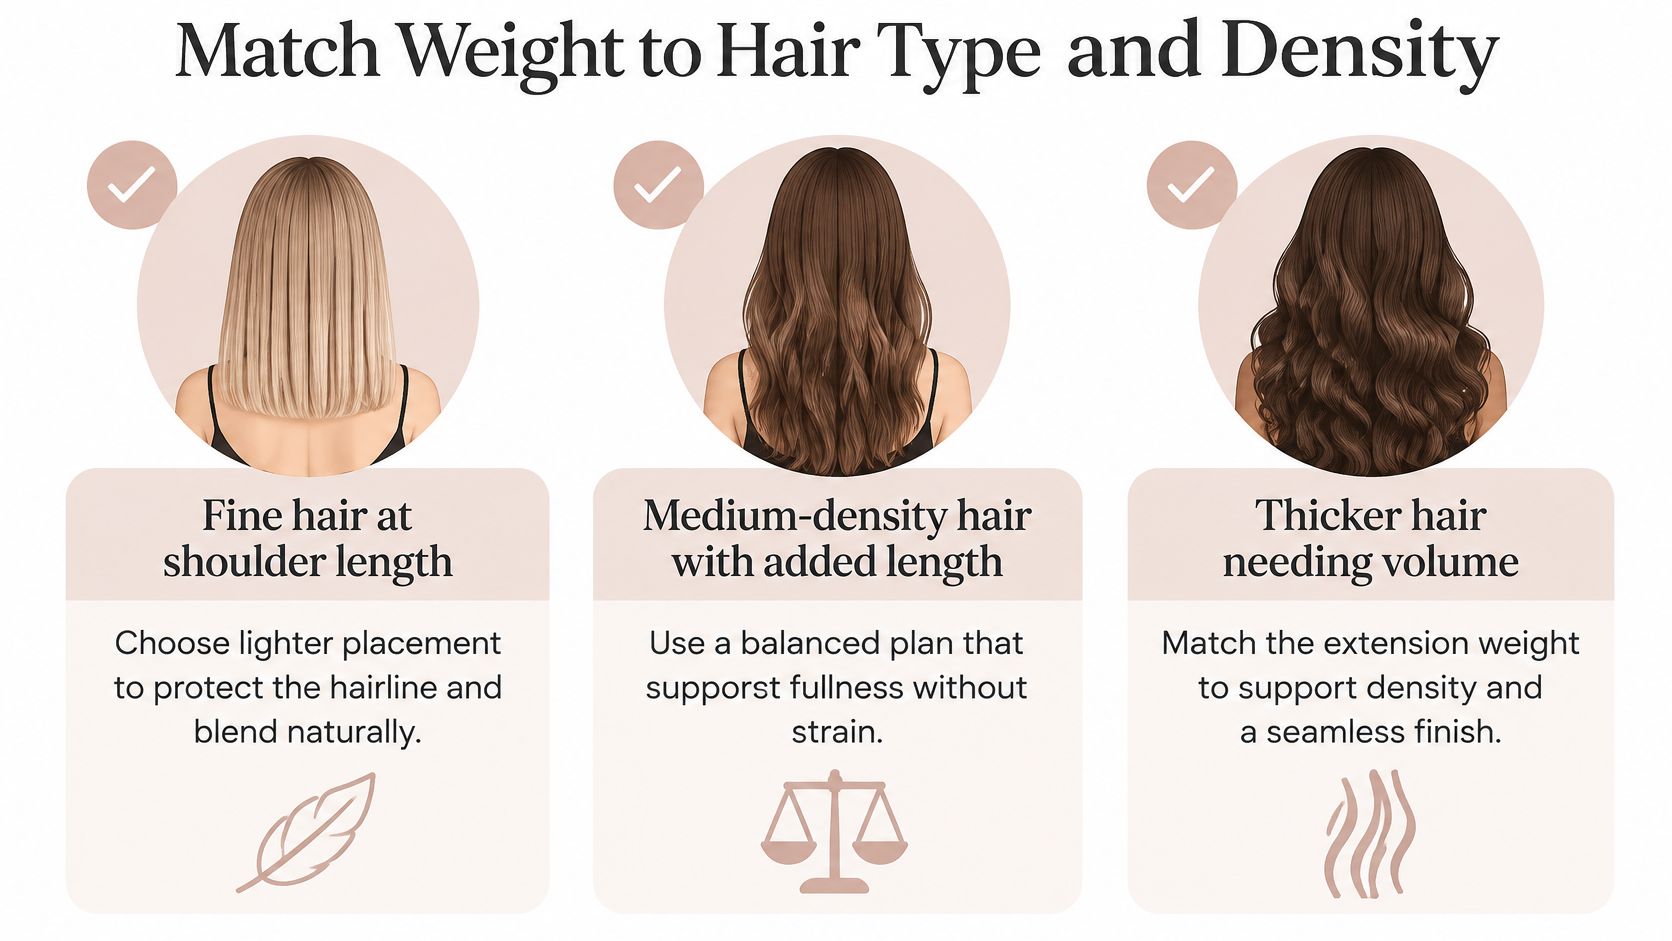
Fine hair and a big length change
Say your fine hair sits at your shoulders and you want waist-length hair. Adding a heavy weft load around the crown or hairline isn't a sensible way to bridge that gap. Those areas may lack both the strength to support it and the coverage to hide it.
A better plan might involve reducing the proposed length, using carefully selected individual attachments, or placing a lightweight weft where the supporting hair is stronger. Fragile perimeter hairs should remain free rather than being recruited to hide a join.
Fine strands and low density aren't identical. Someone can have fine strands but plenty of them, while another person has thicker strands with sparse coverage. Our fine-hair extension guide for Gold Coast clients explains why that distinction changes the fitting decision.
Practical rule: Don't solve a visible join by adding more weight. Reconsider the placement, length or method first.
Thicker hair and targeted fullness
For thick hair needing volume rather than much extra length, flat rows can spread the added hair across a suitable base. The natural hair must still fall freely over the track, and the ends should look balanced rather than disproportionately heavy.
A client wanting only face-framing length needs a different plan. A partial fitting may provide the shape without unnecessary rows at the back, but the front placement still needs enough strong supporting hair and cover.
Medium-density hair with added length sits between those examples. Balance the extension fullness against the natural haircut, especially if there's a blunt shoulder-length line that would otherwise sit visibly above the extensions.
Test the placement in ordinary movement
Don't judge the fitting only while sitting upright with freshly styled hair. Nod, turn your head and put your hair into the loose style you normally wear.
- Check the part: Natural hair shouldn't be drawn sideways towards an attachment.
- Check coverage: Beads, bonds and tracks shouldn't become exposed with ordinary movement.
- Check the load: A heavy sensation when nodding calls for reassessment, not reassurance.
- Check row spacing: Crowded rows need their placement reviewed rather than another row added.
Finish with a mirror check from the sides and back. The natural hair should move over the joins, with no obvious pulling and no need to keep your head in a particular position to hide them.
Prepare a Clean Scalp Before You Attach
Don't install extensions over irritated, broken, infected or unusually inflamed skin. Covering a problem with a track or panel makes inspection and cleaning harder, while pressure at the attachment can make the area more uncomfortable.
The ACT Hairdressing Guidelines explain that infection can spread during hairdressing procedures, including when tools accidentally pierce the skin. Clean-looking hair alone doesn't establish that the scalp and equipment are ready for a fitting.
Clean preparation is part of the service
Queensland hairdressing services must follow the state's personal appearance infection-control requirements, which include a hand-wash basin, a separate equipment-cleaning basin, cleanable surfaces and protected storage for clean linen. These are practical safeguards, not decorative features of a tidy salon.
Preparation should cover the hair, tools and working area:
- Hair and roots: Start with clean, fully dry hair, without styling-product residue at the attachment areas.
- Reusable equipment: Clean sectioning combs, clips and fitting tools using the appropriate salon protocol and equipment instructions.
- Protective materials: Use fresh protective materials and clean towels rather than placing prepared tools on used linen.
- Scalp access: Make sections that allow the practitioner to inspect the skin instead of concealing sore spots beneath attachments.
For scissors, Queensland-published hairdressing hygiene guidance describes cleaning with warm water and detergent, brushing, rinsing under hot running water and drying before disinfection with 70–80% ethyl alcohol or 60–70% isopropyl alcohol. That sequence matters because wiping dirty equipment isn't a substitute for removing hair and residue first.
Specialist extension tools and bonding products need their own appropriate handling. Don't assume a cleaning product suitable for scissors is suitable for every adhesive, bead tool or heated applicator.
Separate maintenance from medical symptoms
A glue-free or heat-free fitting isn't automatically risk-free. Mechanical attachments still create contact, friction and pressure, and poorly dried roots can leave moisture around the joins.
Routine upkeep means gently cleaning the scalp, rinsing thoroughly and drying attachment areas properly. Scrubbing a sore bond or repeatedly picking at an itchy bead isn't maintenance.
Itching accompanied by discharge, spreading redness or painful bumps needs professional assessment, with medical advice where infection is suspected. Don't apply more adhesive, tighten a row or conceal the area with dry shampoo.
A maintenance appointment can address an attachment problem. It can't replace medical assessment of an inflamed or infected scalp.
If the scalp isn't ready, postponing the fitting is the useful decision. A clean foundation matters more than keeping an installation date.
How to Put in Hair Extensions Step by Step
Professional application follows a shared sequence, with the attachment technique changing inside the fitting stage. The Australian competency for selecting and applying hair extensions specifically addresses controlled tension, safe use of heated tools and bonding products, manufacturer instructions, and maintenance and removal advice.
This is a guide to what a sound fitting involves, not a substitute for training with semi-permanent systems. Bead size, adhesive contact, tool pressure and supporting section size all need method-specific judgement.
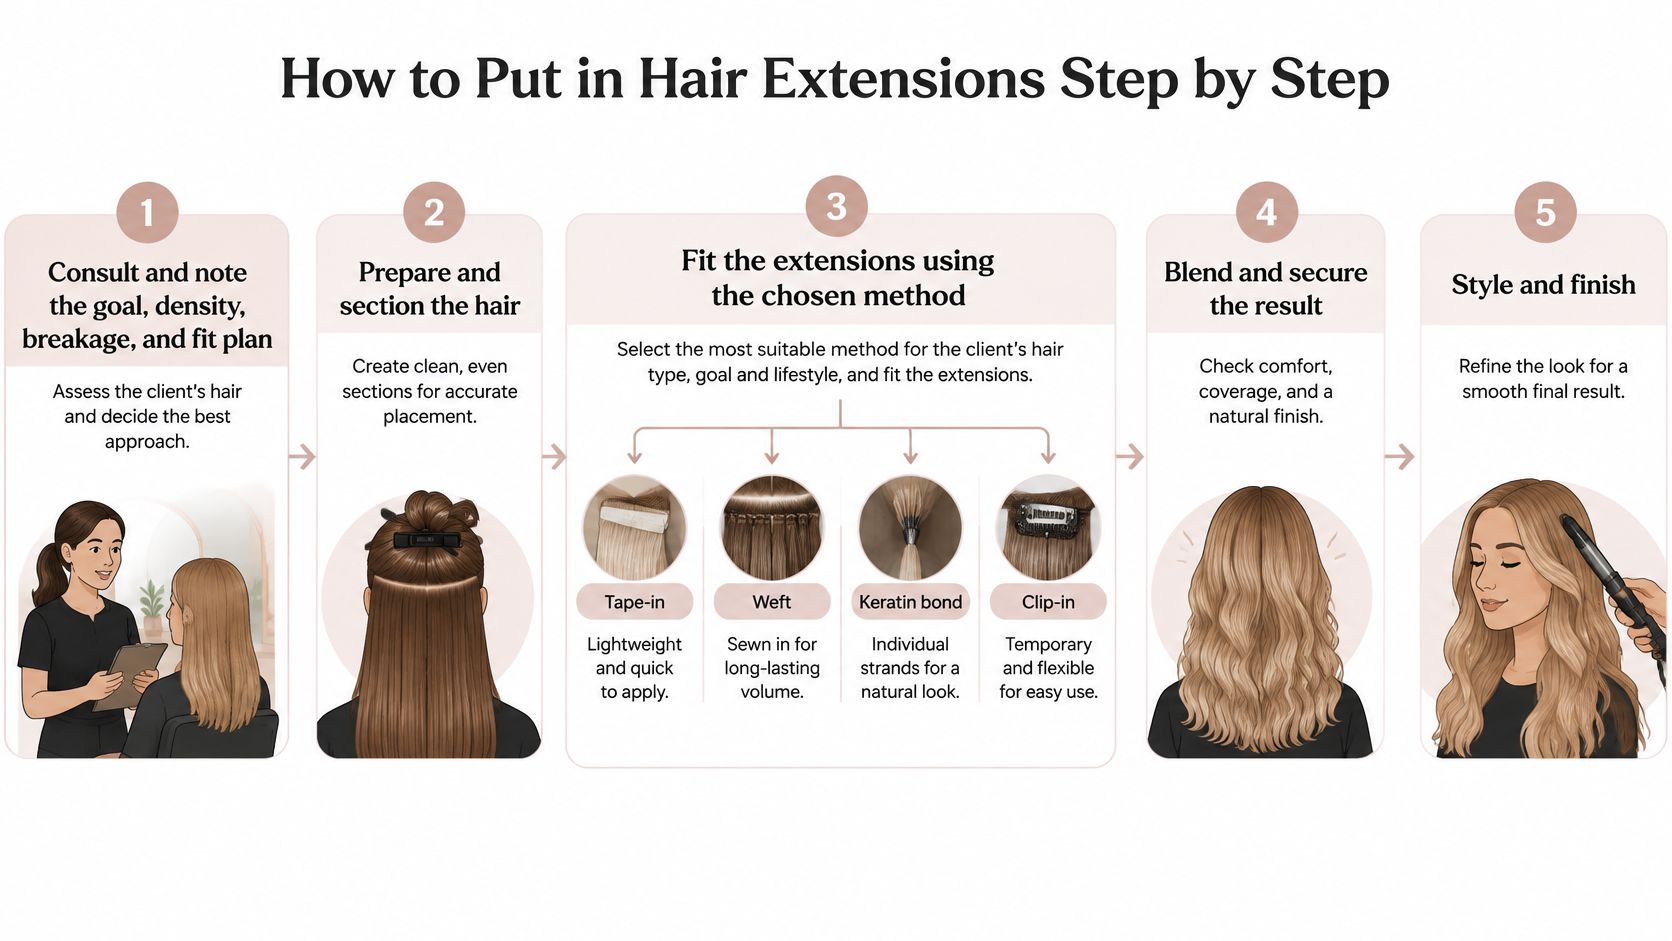
From assessment to fitting
- Record the fitting plan. Note the desired result, starting density, existing breakage and whether the application is full or partial. Identify areas that shouldn't carry attachments, along with the client's usual part and preferred hairstyles.
- Match colour and texture before attaching anything. Compare the added hair against the natural mid-lengths and ends, not just the roots. Human hair is useful for a natural blend, but the shade, texture and amount still need to work with the existing haircut.
- Confirm the hair is ready. Check that the roots and lengths are clean, dry and free of interfering product. Don't try to compensate for oily roots or damp sections by clamping harder or using extra adhesive.
- Create controlled sections. Use a tail comb and sectioning clips to keep the working area organised and prevent neighbouring hairs from crossing into attachments. Leave suitable clearance for movement and keep fragile hairline hairs out of the supporting sections.
-
Fit the chosen system with controlled tension. Use the appropriate tools and product instructions, with the method-specific action contained within this stage:
- Wefts: Establish a flat, balanced anchor row and distribute the load across suitable supporting sections. Don't stack a heavy amount onto a narrow track; our explanation of invisible weft application describes the hidden beaded-row approach.
- Micro and nano beads: Use a threading tool to position the supporting natural section and extension attachment correctly, then close the compatible bead with extension pliers. Keep the attachment clear of the scalp and avoid trapped cross-hairs.
- Keratin bonds: Protect the scalp with an appropriate shield, apply controlled heat to the bond rather than the skin, and form a smooth attachment using the system's technique.
- Tape-ins: Place an even, suitably thin natural-hair panel between aligned tapes. Keep adhesive off the skin and avoid folded edges, uneven contact or loose hairs caught across the panel.
- Clip-ins: Position the clips on stable sections with enough coverage above them. Close each clip without catching stray hairs, check that the piece sits comfortably, and remove it before sleeping.
Finish with movement and a care plan
- Check, blend and shape. Inspect attachment alignment and security, then ask the client to move their head before finishing. Cut and shape the added hair to soften the transition, preserving enough natural hair to cover the joins rather than thinning that cover away.
- Explain upkeep and arrange maintenance. Give clear advice for brushing, washing, drying, sleeping and swimming, plus a refit plan suited to the system and natural growth. Record the method used and make sure the client knows which changes need an earlier appointment.
Removal is part of the original fitting plan, not an afterthought. Semi-permanent attachments belong with a trained practitioner using the correct release tools or removal product; pulling them out or cutting around a hidden join can take natural hair with them.
A sliding bead, catching attachment or changed row position warrants a maintenance check. Don't squeeze a bead shut with household pliers or try to resew a track while it's attached to your own head.
Stop When Tension Hurts the Scalp
Secure does not mean tight. A discreet row can look excellent while still pulling on the hair supporting it. Appearance doesn't tell you whether the follicles are under excessive strain.
The Australasian College of Dermatologists warns that extensions can contribute to traction alopecia and that continued tension may cause irreversible hair loss; it recommends loosening or removing the source of tension as soon as possible. Pain isn't a useful test of whether an attachment will stay in.
Know the difference between awareness and pain
You may notice that there's something new in your hair. That awareness should be different from a headache, stinging attachment, tender scalp or a hairline that feels pulled backwards.
Don't wait for a painful fitting to settle just because the joins look neat. Tell the practitioner exactly where it hurts and which movement triggers it, so the relevant section can be checked.
Scalp signs after an extension fit
| Sign | Usually means | What to do |
|---|---|---|
| Brief awareness of rows on day one | New weight, settling in | Recheck comfort the next day; no need to remove if there is no pain |
| Pain, headache or a pulling hairline | Tension is too high | Loosen or remove the source the same day |
| Redness or sore spots at beads, bonds or wefts | Pressure or friction at the attachment | Stop wearing that row tight; have it refitted or removed |
| Bead slid down or weft feels tighter after weeks | Natural growth has moved the attachment | Book a refit rather than tightening it at home |
| Bald patch or shedding that continues after removal | Possible traction injury | Seek medical advice; do not refit over that area |
These signs guide the next action; they aren't a diagnosis. In particular, a tightening sensation during wear needs inspection because tangling, rotation or uneven movement can contribute, not just natural growth.
Act on discomfort before adding more hair
During application, wincing or repeatedly tilting the head to relieve a pull is a reason to pause. The practitioner needs to inspect the supporting section, attachment direction and trapped hairs before continuing.
The correction may be less extension hair, a different section or removing that attachment altogether. Repositioning a painful join without addressing an excessive load doesn't solve the underlying problem.
Don't accept soreness as the price of a longer-lasting fitting. Comfort is part of checking the installation.
Heat-free and glue-free methods still require restraint. An oversized supporting section can trap hairs growing in different directions, while a poorly closed bead can create pressure or damage the hair inside it.
After tension is released, persistent soreness, a new bald patch or continued localised shedding deserves medical advice. Don't refit over the area to hide it, and don't use extensions as camouflage while the cause remains unclear.
Book a Gold Coast Fitting That Suits Your Hair
Clip-ins for a single event can be a home job if you can position and remove them without pulling. Wefts, beads, bonds and tape intended for ongoing wear are a different job. They need a practitioner who can assess the supporting hair, control placement and plan removal.
When comparing hair extensions on the Gold Coast, look past the finished curl or before-and-after photograph. The useful question is whether the proposed fitting suits your natural hair when it's washed, moving and worn in your ordinary hairstyle.
Bring your everyday routine to the consultation
Hair Extensions Full Stop is a working studio on the Gold Coast, not an online extension shop. The process runs consultation, personalised colour matching, installation, blending and ongoing maintenance, with your natural hair assessed before any method is recommended.
The studio uses 100% human hair extensions, including high-quality Russian and European human hair. A free care guide covers correct washing, suitable products, why heat protectant matters, sleeping and swimming tips, and a recommended maintenance schedule, so you know the upkeep before you commit.
A photo of your ideal length is a starting point. A useful consultation also needs:
- Your normal hairstyle: whether you need a ponytail for work, a centre part or hair that sits behind your ears.
- Your water routine: ocean swimming, pool sessions and how you normally dry your hair afterwards.
- Your previous fittings: any slipping, discomfort or difficult removal, without assuming the same method will behave the same way twice.
- Your realistic upkeep: the brushing, drying and salon maintenance you can manage.
Ask for a workable result
If you're seeing a hair extension specialist on the Gold Coast for your first set, you don't need to arrive knowing which attachment to choose. An assessment should establish what's practical before you commit to a look. Ask how the practitioner decides section size and added weight for your hair, because those choices come out of the assessment, not the photo.
For fine hair, an honest answer may mean a smaller change than the inspiration photo. For denser hair, it may mean enough added fullness to blend properly rather than the longest pieces.
Clients comparing human hair extensions on the Gold Coast should treat hair quality and fitting quality as separate decisions. Good extension hair still needs suitable placement, careful blending and sensible upkeep.
Before committing to hair extension application on the Gold Coast, make sure you understand how you'll wash, sleep, swim and return for maintenance. Those answers should fit your daily life. A fitting that requires you to avoid normal movement to keep the joins hidden is the wrong fitting.
Judge the result with your natural hair worn straight as well as styled, and leave knowing what comfortable wear feels like and when to arrange a check.
Hair Extensions Full Stop offers personalised assessment, colour matching, professional fitting and ongoing maintenance at our Gold Coast studio. Visit Hair Extensions Full Stop and phone the studio to book a consultation for an honest method recommendation based on your hair, your routine and a comfortable result.
Recent Articles


